I do not have any finishes to show you. I have some WIPs. One in fact. I am still working on BOMs from 2+ years ago as I mentioned in my last post.
With all that said I did start a new project, which I am fixing to put in the WIP pile and hopefully finish at a retreat I am going to next moth (more on that later). I have some tips I will be mentioning with this particular project. I decided to try out the 10"slicer from Crafty Gemini. As you may know I am in Vanessa's quilt club, which I love. We have also met in person at a retreat she did, and I consider her a quilty friend indeed! I have at the slicer since the November 2015 Quilty Box, which Vanessa curated and it was fabulous. I just have not had a chance to dig into it yet. I used the tutorial from the craft mummy here. So lets take a look!
First off here is what the slicer looks like. It is made to be used with Layer Cakes (10" square precuts). Vanessa has a ton of info on the her web site about the slicer.
I used a layer cake by Elizabeth Hartman called Rhoda Ruth. Now as the title of the block implies (Wonky Cross Block) it is wonky. So how does one square up a block that is wonky on all sides and no straight edge to start with. Well here is how I do it.
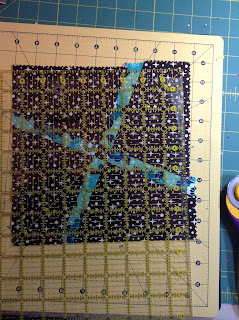
As you can see the constructions leaves some weird edges. This is due to not all precuts being equal, operator error, bias cutting, and well It just happens! I actually glue basted all these seams to help keep the smaller pieces from going crazy and it worked great. As you can tell there are no straight edges to square with.
I used my 12.5 square ruler and the 45 degree line to help me. As you can hopefully see I lined the angle up not the edges. I wanted my blocks to be 8.5 so I match my 45 up so that all the way around I had at least the 8.5 marks all covered by the block. I then made my 1st 2 cuts on the right side and top of the ruler.
Next you can just line up the 8.5 mark as usual along the bottom and left side. The square up the remaining right and top side of the block. There really is not much waste at all with these blocks. I love this fabric line it made the contrast really looks good!
My daughter and I decided that white 1" sashing just along the sides and a 2" boarder of one of the prints would be a great layout for this quilt. She likes to help me design :). Like I said I think I will pack this one to finish the top at the retreat. I like to have a something I know I can finish. It is a little disappointing to not have a finished product when leaving a retreat. Basically I will cut my strips and have that ready to just sew it all up and have a fast finish for the show and tell part. If I am lucky I can have more than one finish, but I like to have a guarantee. I will discuss preparing for a retreat in a later post.
Thanks for stopping by! Again if anyone is out there I would love an encouraging comment. Just to know someone is reading. It does take some time to plan each post, and I am not sure if I am talking to myself or not. Thanks yall! Have a blessed week!


